


Wake Model Railway Services (WMRS)
@wakemodelrailways.bsky.social
A small business offering repairs, servicing, weathering, and more for model railways. Any scale, any gauge, any age.
In this dark hour for the UK, WMRS stands with trans people.
Trans men are men.
Trans women are women.
Non-binary people are real and valid.
I (Lapis) use she/they pronouns.
Trans men are men.
Trans women are women.
Non-binary people are real and valid.
I (Lapis) use she/they pronouns.

April 16, 2025 at 5:42 PM
In this dark hour for the UK, WMRS stands with trans people.
Trans men are men.
Trans women are women.
Non-binary people are real and valid.
I (Lapis) use she/they pronouns.
Trans men are men.
Trans women are women.
Non-binary people are real and valid.
I (Lapis) use she/they pronouns.
Current tank build, a King Tiger from Tamiya, the 5th tank of 20 for Kuromorimine's team.
Almost all the parts are on the model, so next up will be painting the interior before adding the rest of the wheels and gluing the 3 parts of the turret together.
Almost all the parts are on the model, so next up will be painting the interior before adding the rest of the wheels and gluing the 3 parts of the turret together.


March 29, 2025 at 5:15 PM
Current tank build, a King Tiger from Tamiya, the 5th tank of 20 for Kuromorimine's team.
Almost all the parts are on the model, so next up will be painting the interior before adding the rest of the wheels and gluing the 3 parts of the turret together.
Almost all the parts are on the model, so next up will be painting the interior before adding the rest of the wheels and gluing the 3 parts of the turret together.
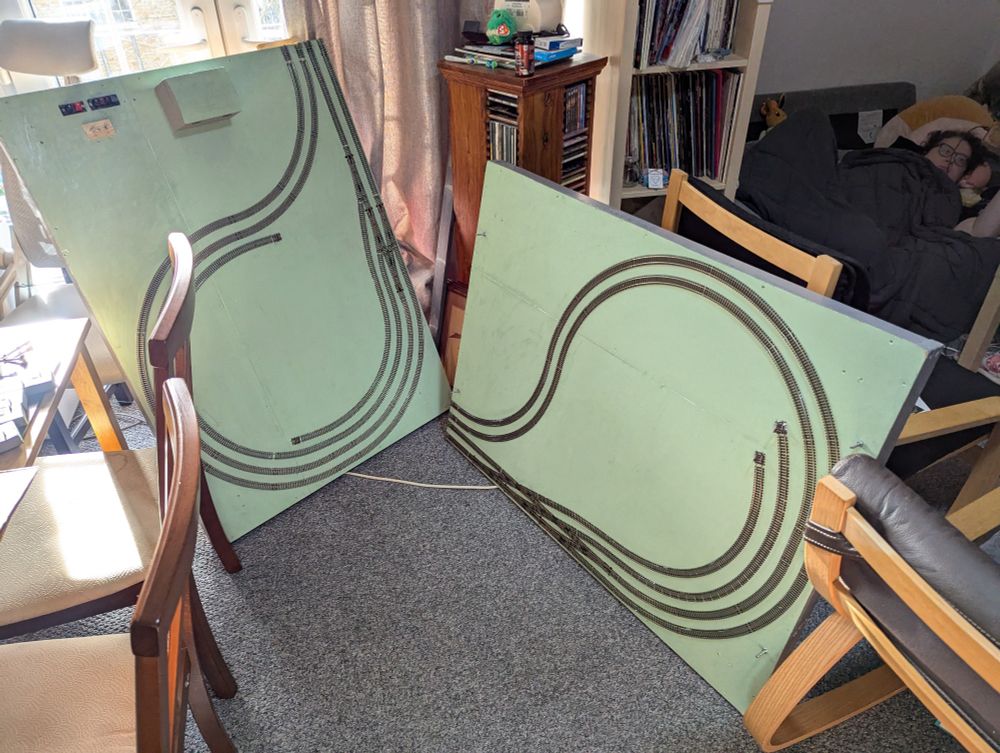
Boards 1 and 4 of Birdforth, now painted front and back with 1 coat of PVA. A 2nd coat will follow.
These boards were in the garage for 8 months, and mould had started growing on the plywood (see pic 2). I cleaned it with antibacterial spray (pic 3), so now PVA will seal it and prevent more growth.
These boards were in the garage for 8 months, and mould had started growing on the plywood (see pic 2). I cleaned it with antibacterial spray (pic 3), so now PVA will seal it and prevent more growth.


March 29, 2025 at 5:13 PM
Boards 1 and 4 of Birdforth, now painted front and back with 1 coat of PVA. A 2nd coat will follow.
These boards were in the garage for 8 months, and mould had started growing on the plywood (see pic 2). I cleaned it with antibacterial spray (pic 3), so now PVA will seal it and prevent more growth.
These boards were in the garage for 8 months, and mould had started growing on the plywood (see pic 2). I cleaned it with antibacterial spray (pic 3), so now PVA will seal it and prevent more growth.
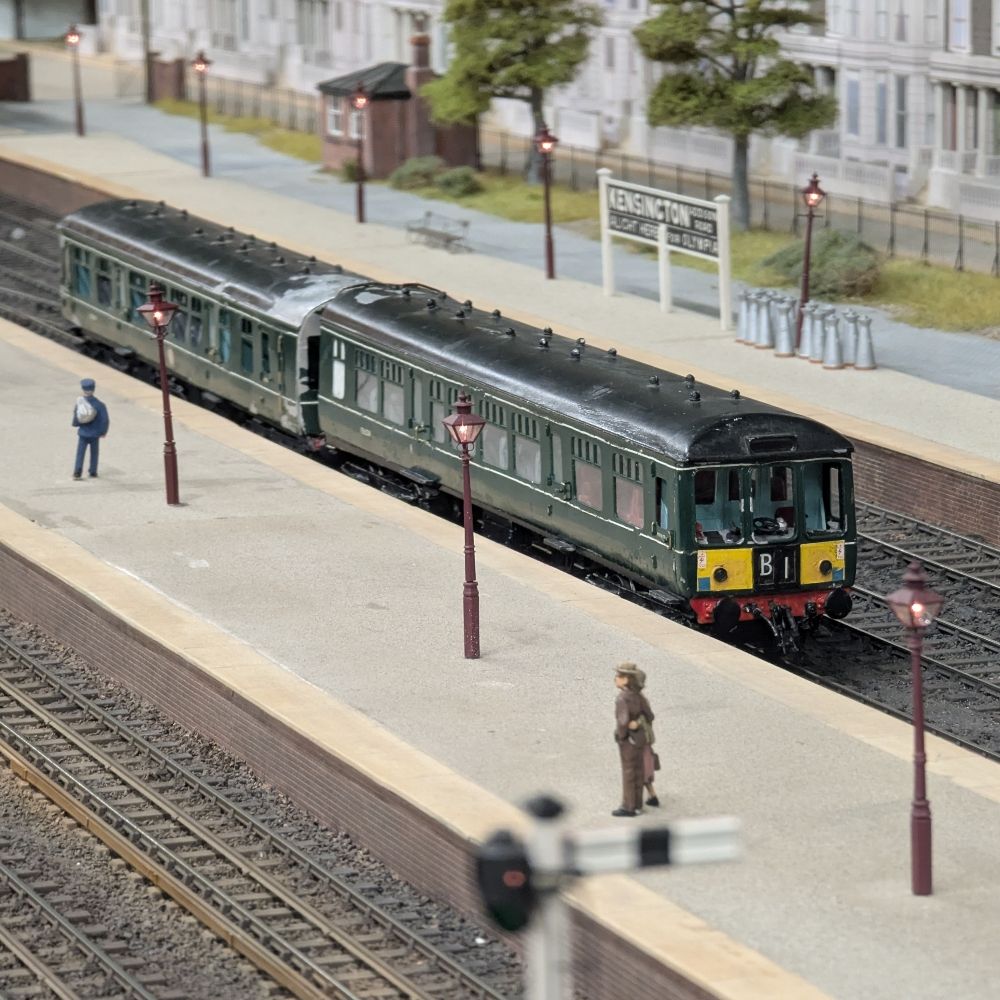
The first running of Birdforth since July, last night.
43063/062 and 50040 Leviathan, on the end boards only.
Annoyingly, control issues with 43063 meant I didn't get most of the work done to the layout that I wanted to do...
43063/062 and 50040 Leviathan, on the end boards only.
Annoyingly, control issues with 43063 meant I didn't get most of the work done to the layout that I wanted to do...
March 29, 2025 at 2:33 PM
The first running of Birdforth since July, last night.
43063/062 and 50040 Leviathan, on the end boards only.
Annoyingly, control issues with 43063 meant I didn't get most of the work done to the layout that I wanted to do...
43063/062 and 50040 Leviathan, on the end boards only.
Annoyingly, control issues with 43063 meant I didn't get most of the work done to the layout that I wanted to do...
Harrogate, Peckett 2050 of 1944 formerly of Harrogate Gas Works, sits on shed at Statfold Junction on Sunday 9/3/25.
My favourite photo I took at the Statfold Barn Railway this weekend. It really shows off how poor quality coal the railway is having to use. It stank...
My favourite photo I took at the Statfold Barn Railway this weekend. It really shows off how poor quality coal the railway is having to use. It stank...

March 12, 2025 at 8:53 PM
Harrogate, Peckett 2050 of 1944 formerly of Harrogate Gas Works, sits on shed at Statfold Junction on Sunday 9/3/25.
My favourite photo I took at the Statfold Barn Railway this weekend. It really shows off how poor quality coal the railway is having to use. It stank...
My favourite photo I took at the Statfold Barn Railway this weekend. It really shows off how poor quality coal the railway is having to use. It stank...
Yesterday's fun. Painting these two 009 items.
A simplex by DoubleM Models, to fit the TU-16A chassis, done in red like the current Corris Railway livery.
GVT Van 5 by Westcliff Works, done in GVT green, as per the Glyn Valley Tramway Trust's tool van. I don't yet have transfers though.
A simplex by DoubleM Models, to fit the TU-16A chassis, done in red like the current Corris Railway livery.
GVT Van 5 by Westcliff Works, done in GVT green, as per the Glyn Valley Tramway Trust's tool van. I don't yet have transfers though.


March 12, 2025 at 8:49 PM
Yesterday's fun. Painting these two 009 items.
A simplex by DoubleM Models, to fit the TU-16A chassis, done in red like the current Corris Railway livery.
GVT Van 5 by Westcliff Works, done in GVT green, as per the Glyn Valley Tramway Trust's tool van. I don't yet have transfers though.
A simplex by DoubleM Models, to fit the TU-16A chassis, done in red like the current Corris Railway livery.
GVT Van 5 by Westcliff Works, done in GVT green, as per the Glyn Valley Tramway Trust's tool van. I don't yet have transfers though.
Everything 009 I acquired at Statfold at the weekend.
DoubleM Models:
Ruston with taller enclosed cab
Ruston with smaller open cab
Mini GVT tram
Simplex
Westcliff Works:
GVT Van 5, rebuilt RNAD van
Bachmann:
Ffestinoog Railway Van 8, passenger brake 3rd
Ffesty 119, Tin Car saloon 3rd with toilet
DoubleM Models:
Ruston with taller enclosed cab
Ruston with smaller open cab
Mini GVT tram
Simplex
Westcliff Works:
GVT Van 5, rebuilt RNAD van
Bachmann:
Ffestinoog Railway Van 8, passenger brake 3rd
Ffesty 119, Tin Car saloon 3rd with toilet


March 12, 2025 at 8:44 PM
Everything 009 I acquired at Statfold at the weekend.
DoubleM Models:
Ruston with taller enclosed cab
Ruston with smaller open cab
Mini GVT tram
Simplex
Westcliff Works:
GVT Van 5, rebuilt RNAD van
Bachmann:
Ffestinoog Railway Van 8, passenger brake 3rd
Ffesty 119, Tin Car saloon 3rd with toilet
DoubleM Models:
Ruston with taller enclosed cab
Ruston with smaller open cab
Mini GVT tram
Simplex
Westcliff Works:
GVT Van 5, rebuilt RNAD van
Bachmann:
Ffestinoog Railway Van 8, passenger brake 3rd
Ffesty 119, Tin Car saloon 3rd with toilet
Part 2 of fixing a seemingly-scratchbuilt L&YR class 30 for a customer.
3 rounds of filling gaps (where the plasticard had gotten brittle and broken away) and sanding back, followed by 2 coats of black paint.
Next up, designing a new cab floor to replace the broken one.
3 rounds of filling gaps (where the plasticard had gotten brittle and broken away) and sanding back, followed by 2 coats of black paint.
Next up, designing a new cab floor to replace the broken one.


March 2, 2025 at 1:44 AM
Part 2 of fixing a seemingly-scratchbuilt L&YR class 30 for a customer.
3 rounds of filling gaps (where the plasticard had gotten brittle and broken away) and sanding back, followed by 2 coats of black paint.
Next up, designing a new cab floor to replace the broken one.
3 rounds of filling gaps (where the plasticard had gotten brittle and broken away) and sanding back, followed by 2 coats of black paint.
Next up, designing a new cab floor to replace the broken one.
0 gauge GWR P14 Starfish by Scorpio, now painted and with transfers.
It has since been varnished, so next up will be creating a removable ballast load, and weathering it to match my 2 Peco P4 Starfish and 2 black Parkside 1/572 Grampus (the red one will stay pristine).
It has since been varnished, so next up will be creating a removable ballast load, and weathering it to match my 2 Peco P4 Starfish and 2 black Parkside 1/572 Grampus (the red one will stay pristine).

March 2, 2025 at 1:42 AM
0 gauge GWR P14 Starfish by Scorpio, now painted and with transfers.
It has since been varnished, so next up will be creating a removable ballast load, and weathering it to match my 2 Peco P4 Starfish and 2 black Parkside 1/572 Grampus (the red one will stay pristine).
It has since been varnished, so next up will be creating a removable ballast load, and weathering it to match my 2 Peco P4 Starfish and 2 black Parkside 1/572 Grampus (the red one will stay pristine).
Airfix 1/72 Focke-Wulf Fw190A-8 now built, complete with transfers and a coat of varnish.
Quite a simple kit, as it was a starter set, but construction got delayed because I didn't have Humbrol 145 to paint half the camo scheme with.
Quite a simple kit, as it was a starter set, but construction got delayed because I didn't have Humbrol 145 to paint half the camo scheme with.

March 2, 2025 at 1:40 AM
Airfix 1/72 Focke-Wulf Fw190A-8 now built, complete with transfers and a coat of varnish.
Quite a simple kit, as it was a starter set, but construction got delayed because I didn't have Humbrol 145 to paint half the camo scheme with.
Quite a simple kit, as it was a starter set, but construction got delayed because I didn't have Humbrol 145 to paint half the camo scheme with.
Heljan class 35 Hymek with a brake van special, plus several other trains, on the MGRT of Twickenham & District MRC.
The Hymek was making a banging sound when running at Tolworth. Turns out it had split gears. So this was its test run after the temporary fix.
The Hymek was making a banging sound when running at Tolworth. Turns out it had split gears. So this was its test run after the temporary fix.
March 2, 2025 at 1:38 AM
Heljan class 35 Hymek with a brake van special, plus several other trains, on the MGRT of Twickenham & District MRC.
The Hymek was making a banging sound when running at Tolworth. Turns out it had split gears. So this was its test run after the temporary fix.
The Hymek was making a banging sound when running at Tolworth. Turns out it had split gears. So this was its test run after the temporary fix.
Heljan class 35 Hymek with 3 Ian Kirk Siphons (kit built by myself) and 3 Lionheart mk1s. Passing Dapol 14xx 1426 with 2 Loriots (L by Scorpio, M by Connoisseur, both built by me) and a Toad (AA7 by Connoisseur, not built by me).
At the Tolworth 0 Gauge Group.
At the Tolworth 0 Gauge Group.
March 2, 2025 at 1:36 AM
Heljan class 35 Hymek with 3 Ian Kirk Siphons (kit built by myself) and 3 Lionheart mk1s. Passing Dapol 14xx 1426 with 2 Loriots (L by Scorpio, M by Connoisseur, both built by me) and a Toad (AA7 by Connoisseur, not built by me).
At the Tolworth 0 Gauge Group.
At the Tolworth 0 Gauge Group.
Yay for split gears!
My 0 gauge Heljan Hymek made a banging noise at the Tolworth 0 Gauge Group on tuesday. Turns out it had 2 split gears!
So I glued them back together, bent the teeth a little to even them out, and now it seems ok.
Brass replacements will be bought after Ally Pally, to last longer
My 0 gauge Heljan Hymek made a banging noise at the Tolworth 0 Gauge Group on tuesday. Turns out it had 2 split gears!
So I glued them back together, bent the teeth a little to even them out, and now it seems ok.
Brass replacements will be bought after Ally Pally, to last longer


March 2, 2025 at 1:33 AM
Yay for split gears!
My 0 gauge Heljan Hymek made a banging noise at the Tolworth 0 Gauge Group on tuesday. Turns out it had 2 split gears!
So I glued them back together, bent the teeth a little to even them out, and now it seems ok.
Brass replacements will be bought after Ally Pally, to last longer
My 0 gauge Heljan Hymek made a banging noise at the Tolworth 0 Gauge Group on tuesday. Turns out it had 2 split gears!
So I glued them back together, bent the teeth a little to even them out, and now it seems ok.
Brass replacements will be bought after Ally Pally, to last longer
One Triang Gresley corridor tender in 00 gauge.
Originally it had a sponge inside that had perished, and a Dublo style coupling.
After cleaning the exterior, I cleaned the wheels, swapped the coupling for a tension lock (including crafting a platform from plasticard), and painted the area black.
Originally it had a sponge inside that had perished, and a Dublo style coupling.
After cleaning the exterior, I cleaned the wheels, swapped the coupling for a tension lock (including crafting a platform from plasticard), and painted the area black.


March 2, 2025 at 1:31 AM
One Triang Gresley corridor tender in 00 gauge.
Originally it had a sponge inside that had perished, and a Dublo style coupling.
After cleaning the exterior, I cleaned the wheels, swapped the coupling for a tension lock (including crafting a platform from plasticard), and painted the area black.
Originally it had a sponge inside that had perished, and a Dublo style coupling.
After cleaning the exterior, I cleaned the wheels, swapped the coupling for a tension lock (including crafting a platform from plasticard), and painted the area black.
Panther #3 complete, minus filling the annoying holes above the tracks.
One more left to build, before I go buy a 5th and 6th (I need 6 in total for the Kuromorimine team).
One more left to build, before I go buy a 5th and 6th (I need 6 in total for the Kuromorimine team).

March 2, 2025 at 1:28 AM
Panther #3 complete, minus filling the annoying holes above the tracks.
One more left to build, before I go buy a 5th and 6th (I need 6 in total for the Kuromorimine team).
One more left to build, before I go buy a 5th and 6th (I need 6 in total for the Kuromorimine team).
Close ups of the door hinges and door handles on the Siphon H, before the body was painted.
These are formed of 0.5mm brass rod, cut to size. The handles are also bent to shape, and fitted into holes I drilled into the doors.
These are formed of 0.5mm brass rod, cut to size. The handles are also bent to shape, and fitted into holes I drilled into the doors.


February 20, 2025 at 2:20 PM
Close ups of the door hinges and door handles on the Siphon H, before the body was painted.
These are formed of 0.5mm brass rod, cut to size. The handles are also bent to shape, and fitted into holes I drilled into the doors.
These are formed of 0.5mm brass rod, cut to size. The handles are also bent to shape, and fitted into holes I drilled into the doors.
Ian Kirk O12 Siphon H update.
It has now gained all its remaining parts that I have (handrails at the corners, door hinges, door handles), and the chassis and body have now been painted.
This is now at the same stage as my O11 and O22 Siphon Gs, just needing transfers before varnish and weathering.
It has now gained all its remaining parts that I have (handrails at the corners, door hinges, door handles), and the chassis and body have now been painted.
This is now at the same stage as my O11 and O22 Siphon Gs, just needing transfers before varnish and weathering.

February 20, 2025 at 2:17 PM
Ian Kirk O12 Siphon H update.
It has now gained all its remaining parts that I have (handrails at the corners, door hinges, door handles), and the chassis and body have now been painted.
This is now at the same stage as my O11 and O22 Siphon Gs, just needing transfers before varnish and weathering.
It has now gained all its remaining parts that I have (handrails at the corners, door hinges, door handles), and the chassis and body have now been painted.
This is now at the same stage as my O11 and O22 Siphon Gs, just needing transfers before varnish and weathering.
Just received this Hornby 50015 Valiant in Dutch livery, factory sound fitted. And the headcode panel lights are on in both directions.
Is this normal for Hornby's 50015? And is it a simple fix, by rewiring the headcode box LEDs in parallel with the High Intensity Headlight?
Thanks for any advice.
Is this normal for Hornby's 50015? And is it a simple fix, by rewiring the headcode box LEDs in parallel with the High Intensity Headlight?
Thanks for any advice.
February 20, 2025 at 2:12 PM
Just received this Hornby 50015 Valiant in Dutch livery, factory sound fitted. And the headcode panel lights are on in both directions.
Is this normal for Hornby's 50015? And is it a simple fix, by rewiring the headcode box LEDs in parallel with the High Intensity Headlight?
Thanks for any advice.
Is this normal for Hornby's 50015? And is it a simple fix, by rewiring the headcode box LEDs in parallel with the High Intensity Headlight?
Thanks for any advice.
Panther #2 now complete, minus filling the horrible gap above the tracks that Tamiya leaves, for some reason.
An enjoyable build, but painting the tyres on all 26 wheels (24 road wheels, 2 tensioners) was very time consuming.
Next up, a 3rd Panther.
An enjoyable build, but painting the tyres on all 26 wheels (24 road wheels, 2 tensioners) was very time consuming.
Next up, a 3rd Panther.


February 16, 2025 at 2:30 AM
Panther #2 now complete, minus filling the horrible gap above the tracks that Tamiya leaves, for some reason.
An enjoyable build, but painting the tyres on all 26 wheels (24 road wheels, 2 tensioners) was very time consuming.
Next up, a 3rd Panther.
An enjoyable build, but painting the tyres on all 26 wheels (24 road wheels, 2 tensioners) was very time consuming.
Next up, a 3rd Panther.
Hornby Flying Scotsman, loco drive ex-trainset, not DCC ready.
I was asked to repair this loco by the Twickenham and District Model Railway Club, before they sell it. And a friend has already called dibs...
Thanks to Hornby's customer care team for providing the parts to reattach the front bogie.
I was asked to repair this loco by the Twickenham and District Model Railway Club, before they sell it. And a friend has already called dibs...
Thanks to Hornby's customer care team for providing the parts to reattach the front bogie.


February 16, 2025 at 2:27 AM
Hornby Flying Scotsman, loco drive ex-trainset, not DCC ready.
I was asked to repair this loco by the Twickenham and District Model Railway Club, before they sell it. And a friend has already called dibs...
Thanks to Hornby's customer care team for providing the parts to reattach the front bogie.
I was asked to repair this loco by the Twickenham and District Model Railway Club, before they sell it. And a friend has already called dibs...
Thanks to Hornby's customer care team for providing the parts to reattach the front bogie.
This evening's task, another 1/35 tank for my Girls Und Panzer fleet.
A 2nd Panzer V Panther ausf A, the 3rd of 20 for Kuromorimine's team.
The tank is about half complete at the moment, but it won't take that much to finish construction. And the paintjob is pretty simple too.
A 2nd Panzer V Panther ausf A, the 3rd of 20 for Kuromorimine's team.
The tank is about half complete at the moment, but it won't take that much to finish construction. And the paintjob is pretty simple too.

February 14, 2025 at 1:44 AM
This evening's task, another 1/35 tank for my Girls Und Panzer fleet.
A 2nd Panzer V Panther ausf A, the 3rd of 20 for Kuromorimine's team.
The tank is about half complete at the moment, but it won't take that much to finish construction. And the paintjob is pretty simple too.
A 2nd Panzer V Panther ausf A, the 3rd of 20 for Kuromorimine's team.
The tank is about half complete at the moment, but it won't take that much to finish construction. And the paintjob is pretty simple too.
4 gas lamps have been added to the roof. These are the ones supplied in the kit, but cut down due to the taller height of the Siphon H vs the Siphon Gs.
The brake rigging has also been constructed using 1.2mm and 0.5mm brass wire, and plasticard. It has since been painted.
The brake rigging has also been constructed using 1.2mm and 0.5mm brass wire, and plasticard. It has since been painted.


February 10, 2025 at 5:23 AM
4 gas lamps have been added to the roof. These are the ones supplied in the kit, but cut down due to the taller height of the Siphon H vs the Siphon Gs.
The brake rigging has also been constructed using 1.2mm and 0.5mm brass wire, and plasticard. It has since been painted.
The brake rigging has also been constructed using 1.2mm and 0.5mm brass wire, and plasticard. It has since been painted.
Siphon H progress #2
Gas tanks have now been added, using the supplied wooden dowel and plasticard strip. Annoyingly, the strip was only enough for 3 straps, so the 4th had to be made from a sheet of plasticard.
Brake rigging still needs to be added to finish the chassis area. A task for tomorrow?
Gas tanks have now been added, using the supplied wooden dowel and plasticard strip. Annoyingly, the strip was only enough for 3 straps, so the 4th had to be made from a sheet of plasticard.
Brake rigging still needs to be added to finish the chassis area. A task for tomorrow?

February 9, 2025 at 2:20 AM
Siphon H progress #2
Gas tanks have now been added, using the supplied wooden dowel and plasticard strip. Annoyingly, the strip was only enough for 3 straps, so the 4th had to be made from a sheet of plasticard.
Brake rigging still needs to be added to finish the chassis area. A task for tomorrow?
Gas tanks have now been added, using the supplied wooden dowel and plasticard strip. Annoyingly, the strip was only enough for 3 straps, so the 4th had to be made from a sheet of plasticard.
Brake rigging still needs to be added to finish the chassis area. A task for tomorrow?
Siphon H progress #1
The roof had a strengthening beam added inside to prevent the body flexing inwards at the centre and causing the filler to crack. This was followed by a couple more rounds of filler and sanding back, to get the roof nice and smooth.
Gutters were then added on both sides.
The roof had a strengthening beam added inside to prevent the body flexing inwards at the centre and causing the filler to crack. This was followed by a couple more rounds of filler and sanding back, to get the roof nice and smooth.
Gutters were then added on both sides.

February 9, 2025 at 2:18 AM
Siphon H progress #1
The roof had a strengthening beam added inside to prevent the body flexing inwards at the centre and causing the filler to crack. This was followed by a couple more rounds of filler and sanding back, to get the roof nice and smooth.
Gutters were then added on both sides.
The roof had a strengthening beam added inside to prevent the body flexing inwards at the centre and causing the filler to crack. This was followed by a couple more rounds of filler and sanding back, to get the roof nice and smooth.
Gutters were then added on both sides.
#3 of 3, a 1980s release Hornby Caledonian Single in LMS livery, again belonging to @hazelofsodor.bsky.social.
This loco had a loose wire, so I had to solder it to the copper on one of the carbon brushes. Otherwise, a regular clean and oil, and she's perfect (except a little noisy)
This loco had a loose wire, so I had to solder it to the copper on one of the carbon brushes. Otherwise, a regular clean and oil, and she's perfect (except a little noisy)
February 7, 2025 at 3:25 AM
#3 of 3, a 1980s release Hornby Caledonian Single in LMS livery, again belonging to @hazelofsodor.bsky.social.
This loco had a loose wire, so I had to solder it to the copper on one of the carbon brushes. Otherwise, a regular clean and oil, and she's perfect (except a little noisy)
This loco had a loose wire, so I had to solder it to the copper on one of the carbon brushes. Otherwise, a regular clean and oil, and she's perfect (except a little noisy)